Thursday, December 6, 2012

Savory Pumpkin Pie

One of my friends brought over a pumpkin pie for Thanksgiving that she said was "a dinner pie". I was confused and a little skeptical...

Ok. SUPER skeptical. So skeptical that I didn't even eat any on Thanksgiving. But I had some of the leftovers and it was AMAZING! She didn't follow a recipe...all she told me was that she was making a regular pumpkin pie and then decided to throw some caramelized onions and some extra spices in! Below is my recipe for a savory pumpkin pie :)


Savory pumpkin pie 
Savory Pumpkin Pie

  • 29 oz can of pumpkin puree
  • 1 onion, sliced
  • 1 cup cooked ulu, diced
  • 2 Tbsp butter
  • 2 tsp ground cinnamon
  • 1 tsp ground ginger
  • 1 tsp ground cloves
  • dash of chili powder, basically to taste
  • 1 tsp salt
  • 1 12 oz can coconut milk
  • 3-4 eggs
  • Pie crust--This crust is the best! It tastes like a cheez-it!
Preheat the oven to 375F. Make the pie crust ahead of time and refrigerate until the pie filling is ready. Caramelize the onions with the butter. Mix all the other ingredients, except eggs, and adjust the spice to your taste. I personally think I need to adjust my spices...maybe some herbs? A little more heat? Not sure. It still turned out good but I think it would be amazing with a little...something. Once your spices are adjusted add the eggs. Roll out the pie crust dough and place in pie pan and put in the filling. Bake the pie for 1 hour but check after 45 minutes. You don't want this pie to be runny in the middle so keep checking the texture. 


Savory pumpkin pie (back) and Luau pie (front)


Wednesday, December 5, 2012

Bacon, Kale Macaroni and Cheese

Ok. I'm going to apologize ahead of time. THERE ARE NO PICTURES! This was a very impromptu dish and I forgot to document the process and the final product. But it was so GOOD that I had to share!

I have to admit that this amazing recipe was not my brain child. I had a taste of it while I was in Washington. It was so good that I had to try and replicate it. The following recipe is what I could come up with! I love that it uses kale!

Bacon Kale Macaroni and Cheese
  • 1lb pasta 
  • One medium onion, diced
  • One bunch of kale, chopped
  • 4 mushrooms, diced
  • 4 slices of cooked bacon, chopped
  • 4 Tbsp butter, plus some for greasing pan and carmelizing onions
  • 4-5 Tbsp flour
  • 2 cups milk
  • 2 cups sharp cheddar cheese, grated
  • 1.5-2 cups parmesan cheese, grated
  • 1-2 Tbsp fresh sage, finely chopped
  • 1 cup breadcrumbs (optional)
  • Salt and pepper to taste
Grease your baking dish with butter. Cook the pasta, drain and set aside. Carmelize the onions with butter and some olive oil. Set aside. Saute the mushrooms and set aside with onions. Preheat the oven to 375F. 

Now make the bechamel sauce. Melt the 4 Tbsp of butter in a sauce pan. Once the butter is melted slowly add the flour while whisking. Once you have a fairly thick roux let it cook a little longer so the flavor is deeper. Add the milk and whisk. Now I'm pretty sure the measurements are correct but obviously adjust amounts if the sauce is too runny (slowly add flour) or too thick (slowly add milk). Now add the sage and the cheeses. Keep stirring until the cheese is melted. Mix in the bacon, onion, kale, and mushrooms.

Put the pasta in the baking dish and pour sauce over, mix it up a little bit. Sprinkle breadcrumbs evenly across the top and bake for 10 minutes. You don't want to put it in too long because it could dry up. Just bake it long enough to get hot. You may not even need to go that long. I took my dish over to a friend's house and that is why I baked it...to warm it up. 

ENJOY!


Thursday, November 29, 2012

Rice Balls

My husband and I recently got back from a trip to Washington with his family. We had a great time staying at Guemes Island Resort. We had a lot of fun kayaking, beach combing, puzzling, and, of course, EATING!

We had so much food. Seriously. I think I gained ten pounds.

But I was most excited about making rice balls! I had never had them before meeting my husband and I've added them to the looooong list of why I'm thankful I married him.

Also...if rice balls weren't exciting enough...this is the first post that I will have SEVERAL pictures of the process and the chefs. My wonderful mother-in-law was a very diligent photographer.

Rice Balls

Rice mixture
  • 4 cups dry rice
  • 2 eggs, egg yolks only (reserve whites for the breading)
  • 1-1.5 sticks of butter
  • 1 cup grated parmesan cheese
  • 1 Tbsp parsley flakes
  • Salt and pepper
Meat mixture
  • 1 lb ground beef
  • 1 can tomato paste
  • 1-1.5 cans water
  • 1/2 onion, diced
  • 1 clove garlic, minced
  • 1 Tsp Italian seasoning
  • 1 Tsp salt
  • 1/2 tsp pepper
  • 1/2 tsp sugar (optional)
  • 1/3 cup raisins, minced (optional)
Breading
  • 2 eggs, plus remaining egg whites
  • 2 cans Italian flavored bread crumbs
Cook the rice. Once cooked, combine rice with other "rice mixture" ingredients. Refrigerate overnight.  


Rice mixture that has been refrigerated overnight.
Saute the onion and then add the beef and garlic. Once the beef is cooked add the rest of the ingredients. Simmer until most of the liquid is gone.
Dicing onions! And crying!


Dan came to help us cook!

Cooking the meat mixture
Make a rice ball assembly line: rice mixture, meat mixture, beaten eggs, and finally, bread crumbs.

Rice ball assembly line
To make the rice ball you first make a "nest" with a heaping tablespoon of the rice mixture in your hand. Once you have a "nest" put a little more than a teaspoon of the meat mixture into the middle of the rice "nest".   This is the part that is hard to put into words...you have to work the rice around the meat mixture. Cup your hand closer and closer together while pushing the edges of the rice towards one another with your other hand.

Making the nest for the meat mixture

Make sure to fill in any holes with rice!
Shape the rice blob into a ball. Make sure there are no "holes" for the meat mixture to escape. Next you dip the rice ball into the egg, followed by the breadcrumbs.

Dip in the egg 

Bread the ball
Place the breaded rice balls on a plate and heat the fryer to 350F. Do not crowd the fryer, make batches of 3-4. Fry until golden brown.
Breaded rice balls
Below is what the rice balls will look like after coming out of the fryer!

Finished product! 
Enjoy! Some people...like to take a bite and then add a pat of butter to the rice ball. But they are absolutely delicious without any butter, sauce, condiments, etc!
James, Jonn, Dan, and Fletcher enjoying rice balls! Men of the buttered-balls persuasion :)
Cody, Andy, and Claire enjoying that first bite!


Monday, October 29, 2012

Kombucha--The Beginning

Kombucha and I have been in a passionate love affair for many years now. But it's always been sort of an "unhealthy" relationship, where I spend all my money and get only 16 oz of pleasure. But that is all about to change! 

This weekend my room mate, Grier, and I went to a kombucha growing class! It was so awesome! The class was held at The Green House. They offer all sorts of classes on sustainable living. I'm really looking forward to more classes! But, back to kombucha. For $20 we were able to talk to a woman who has been growing kombucha for several years and was very knowledgeable, we got a starter kombucha, and we got inoculate. I learned a lot about kombucha as well. Here is what I learned that I didn't know about kombucha:
  • Kombucha is the liquid produced by a symbiotic organism!! It is a SCOBY (Symbiotic Colony of Bacteria and Yeast). I always thought that it was a mushroom because it's often called "mushroom tea". 
  • You feed the SCOBY a mixture of brewed tea, green or black, (that has cooled to room temperature) and sugar. 
  • Depending on how strong you like your kombucha, you can have kombucha within three days!
  • The SCOBY will grow to fit your jar and once it gets large you can cut it up and start new colonies!

My kombucha colony...DAY 1!

Tuesday, October 23, 2012

Jumbalaya, Jalapeno corn bread, and baked okra

This dinner is a compilation of some of my favorite dishes! But before we get into dinner...I would just like to brag about the bouquet I made this past Sunday. 


Ginger and birds of paradise bouquet
Isn't it so pretty?!

Ok. Dinner.

I got the recipe for baked okra from Pinterest. The original posting is from the cooking blog Cookin' Cowgirl. I LOVE THIS SNACK! It's so tasty and very healthy (if you ignore the mayonnaise-based dip). I have to admit that I have never had fried okra but I am seriously pleased with this baked recipe. And any recipe that cause my room mates to cheer whenever I say that I'm making it is a winner.

Baked Okra

  • Okra, cut into 1/2 to 1 inch pieces
  • Buttermilk, enough to cover okra
  • 2 cups cornmeal
  • 1 TBSP creole seasoning
Preheat the oven to 400F. Cut the okra and toss in the buttermilk. Put the cornmeal, creole seasoning, and okra into a gallon ziploc bag and shake until okra is evenly coated with cornmeal. Grease a cookie sheet. Spread the okra on the sheet in one layer. Bake for 15 minutes. Turn each okra so the other side crisps. Bake another 15 minutes. They cool fairly quick so no need to cool, just put them on a plate and serve!

BBQ sauce aioli
  • BBQ sauce
  • Mayonnaise 
Aiolis are extremely easy, especially if you are lazy like me and use store bought mayo. I usually put 4-5 TBSP mayo to start and then add the flavoring in increments (BBQ sauce in this case). It ended up being about 1:1 ratio. I've also made a soy sauce aioli and a sriracha aioli to go along with baked okra. 


Baked okra with BBQ sauce aioli
Jumbalaya is one of the dinner recipes my mom used to make all the time when I was growing up. It's super tasty and healthy! It actually came from a Weight Watcher's recipe. I always double my mom's recipe because it's nice to have leftovers or in my case I cook for 7.

Jumbalaya

  • 2 cups rice
  • 4 cans diced tomatoes (14.5oz)
  • 2 green bell peppers, diced
  • 2 onions, diced
  • 4-5 garlic cloves, minced
  • 3 chicken thighs, cubed
  • 4 hot link sausages, cubed
  • 2.5 cups water with chicken bouillon 
  • 4 sprigs fresh thyme
  • black pepper
Preheat the oven to 350F. Cut up the peppers, onions, garlic, chicken, sausages, and thyme. Mix all of them together in a big bowl with the rest of the ingredients. My mom sautes the peppers, onion, and garlic first but I'm lazy and leave it to cook while baking. Same with the chicken and sausage, I just throw them in raw and they cook in the oven. Pour the mixture into a casserole pan and bake for 1 hr and 15 min. 


Jumbalaya 
Kevin photo bombed the jumbalaya
I love cornbread. It is so good. I usually put canned corn and chopped jalapenos in the batter and make corn muffins. However, I didn't have any corn in the pantry and I didn't want to drive to the store just for corn so I made pan cornbread instead.

Jalapeno corn bread with honey drizzle

  • 1 cup flour
  • 1 cup corn meal
  • 1 TBSP baking powder
  • 1 egg
  • 1/3 + 1 TBSP vegetable oil
  • 1 + 1/4 cup buttermilk
  • Sliced jalapenos
  • Honey
Preheat oven to 350F. Mix all ingredients together but do not over stir. Pour batter into 13" x 9" baking pan and distribute evenly. Top the batter with the sliced jalapenos. Bake for 20 min. Remove from oven and drizzle honey on top. 


Jalapeno cornbread with honey drizzle
And for dessert, Kevin made peanut butter cookies! They were delicious! I don't have the recipe but if there is any interest I can post it later :)

Kevin's Peanut Butter Cookies

  • 1/2 cup creamy peanut butter
  • 1/2 cup brown sugar
  • 1/2 cup sugar
  • 1/2 cup butter
  • 1/2 tsp salt
  • 1/2 tsp baking soda
  • 1/2 cup flour
  • 1 egg
  • 1/2 tsp vanilla
Preheat oven to 375F. Mix the butter and peanut butter together. Add sugar, brown sugar, salt, baking soda, vanilla, flour, and egg. Wait 1/2 hour for the batter to stiffen. Flour your hands and roll little balls. Place the balls on the cookie sheet and flatten them with a fork four times in a criss-cross pattern. Sprinkle the cookies with sugar and bake for 8-10 minutes. 


Kevin's peanut butter cookies 


Thursday, September 27, 2012

Shrimp with Red Peppers and Daikon Soup


This recipe is from a cookbook I received from my super generous mom. I read about the cookbook on NPR and asked for it as a birthday present. It's an awesome cookbook. The recipes are simple yet flavorful. Each recipe is accompanied by an anecdote about early communism in China. And it's replete with beautiful propaganda drawings. 

Cover of the cookbook
I've had this cookbook for a while...it's been read and looked at but had not been used. My husband decided to make one of the shrimp dishes as he is a shrimp farmer and has access to fresh, delicious shrimp!

The recipe my dear husband decided to make
Whenever my husband or I cook we try to only use ingredients that we already have at hand. In this case the original recipe calls for green peppers and all we had was red peppers so we just kept it homogenous...you feel me?

Shrimp with Red Peppers

  • 1lb shrimp, peeled
  • 1/2 tsp vinegar (Dan used rice wine)
  • 1 Tbsp sugar
  • 2 Tbsp soy sauce
  • 1 Tbsp cornstarch
  • 1.5 red peppers
  • 2-3 garlic cloves
  • 4 Tbsp vegetable oil

Serve with rice!

Marinate the shrimp with the vinegar, sugar, soy sauce, and cornstarch. I believe Dan marinated our shrimp for about an hour. 

Heat your wok WITHOUT oil and stir-fry the red peppers until they are a little soft. About 3 minutes. Remove them before they change color onto a plate.

Let the wok re-heat without oil again and once hot and oil. Once it is smoking slightly, add the garlic and stir-fry briefly...10 seconds. Add the shrimp with the sauce and cook until pink...should be about 1-2 minutes. Add the peppers, mix, and serve. 

Dan finishing the stir-fry
Final product. 
Ok. So. Daikon soup...aka radish soup. It sounds strange and bland but I love this soup. I was first introduced to daikon soup when my husband and I went out to dinner at a local Korean restaurant, Willow Tree. They serve this soup as an appetizer and I LOVE IT! I still haven't perfected the recipe but here's what I've come up with so far.

Daikon and Kim Chi Soup


  • 1-2lbs daikon, cubed
  • 1 onion, sliced
  • 1/4-1/2 cup kim chi (basically to taste)
  • 1 tsp beef flavored Better than Bouillon
  • 6 cups water


Put the daikon, onion, bouillon and water in a large pot. Boil until the daikon is tender. Add the kim chi and take off the heat. Enjoy!

Daikon I bought at the Kaneohe Farmer's Market. Usually they are much bigger than this.
Daikon, onion boiling in the water. 


Monday, September 24, 2012

Hanauma Bay--Witches Brew


Hanauma Bay is a very popular tourist destination for both snorkeling and SCUBA diving. I have only been diving there a handful of times because the logistics are more complicated than other shore dives. Things to consider before planning a dive here:

      • PARKING--there is limited parking in the lot, plan on getting there before 9:30am
      • THE MOVIE--Unless you have visited Hanauma Bay within the last year you are required to watch an informational video about the bay. If you must watch it don't forget to sign the sheet at the front of the room before leaving the theatre! Then you are in their system for 1 year. 
      • THE HILL--there is a fairly large/steep hill that you must go down and up. You can either be a total bad-ass and trek it with all your gear OR you can pay $3 and get a ride both ways for you and your gear! Work smarter, not harder :)
      • TIDE/WAVES/WIND--the conditions are important. There are only two channels between the calm inner reef and the outer reef. If the waves are breaking over the barrier reef it creates "suction" in these channels. This will make it relatively easy to get out but will be very difficult to swim back in. 

Map of my Hanauma Bay dive (approximately).

My dive partners and I were very fortunate and had great weather for our dive. The sun was out, the waves were almost non-existent and the visibility was fairly good.

"Do you see the octopus...he'e?"--Hanauma Bay video
I was really happy with all the organisms we saw during our dive! Above is a Day octopus about to go into a hole in the rocks. My strobe has been mis-behaving recently so this picture isn't as clear as I would like it to be.

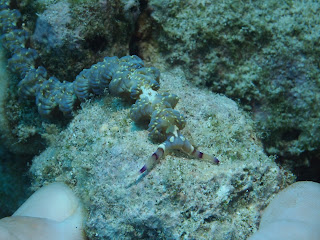
Blue Dragon Nudibranch
This was the only species of nudibranch we found during the dive. Between the five of us we probably saw ten individuals. I like this picture because my dive buddy's thumb and index finger make you realize just how small they are!

Triton's Trumpet
My dive buddy, Kevin, with the Triton's Trumpet
Kevin was very excited when we found this Triton's Trumpet. Can you see how big his eyes are?

School of fish
The picture above has one of my favorite Hawaiian fish species, humuhumu 'ele'ele. They have the most amazing pattern and coloration on their faces.

Reef ridge
Just around the peninsula where we had our dive flag there were several of these ridges or fingers. They were very picturesque and it was really fun to swim in the "valleys" between ridges.

If you clicked on the species names I provided you noticed that I kept linking to the same website: Keoki Stender's Flora & Fauna ID Site. Keoki and his wife Yuko are amazing underwater photographers and their website is incredibly useful. I use their website to ID any organism I don't recognize.

Thursday, September 6, 2012

Spicy Grilled Veggies and Orzo Bake

I found this recipe on Pinterest and it sounded really good! Grilled eggplant is just amazing. The original recipe is from Veggie num num. She has some great vegetarian recipes if anyone is interested! I forgot to mention a few key aspects to my goals: I have 6 room mates that I like to cook for and I am on a budget. Soooo....yeah. I never follow a recipe to the "T" unless it makes a lot and is inexpensive. I had to tweak the Spicy Eggplant and Risoni Bake to my budget and supplies

First thing you will notice in the original recipe is that it calls for 3 cups passata and about 1 tsp harissa paste. If you are like me your first thought was "Whaaaaa?". Second thought, "MEH. I'll use tomato paste, canned diced tomatoes, and red pepper flakes". I'm sure harissa and passata would make this dish absolutely spectacular but I can say with 100% certainty that I don't have time to make either of those from scratch and there is no way that I am going to find either of those products here in Hawai'i. No way. I also had orzo in my pantry and figured it looks like risoni so hopefully it will cook like it too! Below is my version of this dish.

Spicy Grilled Veggies and Orzo Bake
  • 4 garlic cloves, minced
  • 2 cups orzo
  • 3 cups water + 2-3 Tbsp Better Than Bouillon
  • 2 cans diced tomatoes with juice
  • 1 can tomato paste
  • 4 Japanese eggplants, cut lengthwise and about 1/4-1/2" thick
  • 2 zucchini, cut lengthwise and about 1/2" thick
  • 1 red bell pepper, but into 6 pieces 
  • 1 onion, cut into rings
  • Olive oil
  • Grape tomatoes, cut in half (as many as you want!)
  • Red pepper flakes (to taste, I like things spicy so I added quite a bit)
  • Fresh ground pepper
  • Fresh oregano
  • Fresh basil
The longest part of this process was slicing the veggies and grilling. I didn't start cooking until after 5 pm so the dish didn't get out of the oven and on to the table until 8pm....and I'm obsessed with chopping so I did all the work myself. And I made myself a rum and coke. All of these things will slow you down. 

So...grill the veggies!

 
Grilled eggplant is so freaking tasty. I made a TON extra because it is so good. Probably why it took me so long, I had to do several batches on the grill! 


Grilled zucchini! Not as good as eggplant but still really good. I didn't take any pics of the red bell pepper or the onion because the sun had set and it was too dark :(


Don't forget to have a grill buddy to keep you company! My grill buddy is sad because I didn't drop anything. Poor Gizmo!

After you are done grilling all the veggies, preheat the oven to 350F and heat oil in a sauce pan (one big enough to hold the diced tomatoes, tomato paste, 3 cups chicken stock, orzo). Sautee the garlic for a minute or so. I added a dash of cooking sherry to the garlic because my oil was really hot and it browned them a little too much. Then add the tomato paste and diced tomatoes with the juice! Stir that up with ground pepper, red pepper flakes and some of the basil and oregano (reserve some of the fresh herbs to put on top of finished product). Add the chicken stock and the orzo. I didn't cook the orzo completely, I think it was only 5 minutes. Then put this sauce into a casserole dish. There will be a lot of liquid at this point, don't worry it will get absorbed. 


Grape tomatoes from the Kaneohe Farmer's Market! These are so tasty! I buy a bag of these every week!

Now the fun part! On top of the sauce, layer your grilled veggies and grape tomatoes. I put the grilled onions on first, then grape tomatoes, followed by a layer of zucchini, eggplant, and red bell pepper. Bake for about 40 minutes or until liquid has been cooked off. 

Final product....


This dish was really tasty, healthy, and VEGETARIAN! Well, mostly. Chicken stock. What are you going to do. Apparently my beloved Better Than Bouillon comes in many flavors though, not just chicken! You could easily make this a totally veggie dish. 

Wednesday, September 5, 2012

What it's all about :)

I love SCUBA diving and I also love to cook delicious food! I'm using this blog to chronicle my diving and cooking adventures. Hopefully this blog will encourage me to try new recipes (maybe come up with a few of my own??) and help me record my dives.

DIVING 
I am a NAUI Masterdiver and have been certified since 2005. I try to go diving at least one day every weekend but sometimes the waves have other ideas. For the frequent diver, boat dives are expensive! So I do shore dives almost exclusively. My husband, friends, and I started exploring shore dive sites around O'ahu and have found some great spots! My plan for the diving aspect of this blog is to map out the dives I do and to showcase some of the organisms I see. Diving new sites is one of the most thrilling parts of diving! You don't know what kinds of fish, algae, coral, and other invertebrates you will see!

   Scrambled Egg nudibranch, Taken by Claire L. at Ni'ihau 

COOKING
I am not a chef, I am a marine biologist that happens to love food. LOVE IT. If I had to describe my cooking abilities I would say average. I normally have a set "menu" which I cook from. You know, the standards that you always fall back to. Frozen veggie stir frys, spaghetti, pizza...you get the idea. Boring. So I would like to change that. I am going to try at least one new recipe every week and discuss how successful it was or why it flopped. This will help me become a better cook and maybe help you avoid making my mistakes :)

   Hahaha. Only example of my cooking that I have right now. 
              Sunny side up eggs (eyes), cornbread (nose), and bacon (smile).